- Created by Jacques Marais , last modified on Sept 13, 2018
You are viewing an old version of this content. View the current version.
Compare with Current View Version History
« Previous Version 31 Current »
As a System Admin I want to invite Farmers.
Lesson Outcomes
By the end of this lesson you should:
- Be able to hide and show table columns based on unit variables or functions
- Be able to use unit variable values for view widget labels
- Be able to use date and text area input fields
New & Modified App Files
./model/Farmer.mez
./web-app/lang/en.lang
./web-app/presenters/FarmerUserMgmt.mez
./web-app/views/FarmerUserDetails.vxml
./web-app/views/FarmerUserMgmt.vxml
Farmer CRUD Functionality
As with many of the other lessons we start by adding a model object. In this case representing a farmer which will also be a role:
@Role("Farmer")
persistent object Farmer {

	// Farmer details
	@requiredFieldValidator("validator.required_field")
	string firstName;

	@requiredFieldValidator("validator.required_field")
	string lastName;

	@requiredFieldValidator("validator.required_field")
	string mobileNumber;

	@requiredFieldValidator("validator.required_field")
	string emailAddress;

	// Farm details
	@requiredFieldValidator("validator.required_field")
	string farmAddress;

	@requiredFieldValidator("validator.required_field")
	decimal farmSize;

	@requiredFieldValidator("validator.required_field")
	decimal longitude;

	@requiredFieldValidator("validator.required_field")
	decimal latitude;

	@requiredFieldValidator("validator.required_field")
	STATES state;

	// When last did this farmer visit any shop
	datetime lastShopVisit;

	// Meta information
	datetime registeredOn;
	datetime updatedOn;
	bool deleted;
}
We also proceed to add CRUD functionality for the Farmer object. Seeing as this type of CRUD functionality has already been covered in previous lessons, only certain aspects are highlighted below. For more details, please refer to the lesson source code.
Text Area
For cases where users should be allowed to enter multi line text as part of a form input field, a text area can be used instead of a normal text field. See below the code and screenshot from our farmer CRUD functionality for an example:
<textarea label="textarea.farm_address">
	<binding variable="farmer">
		<attribute name="farmAddress"/>
	</binding>
</textarea>
See the screenshot below for an illustration of this:

Date and Time Input
date and datetime data types have already been mentioned in Lesson 5. In that lesson the values for a datetime data model attribute was set using the Mez:now function. For the farmer CRUD functionality we would like to record when a farmer last visited a shop. This needs to be captured through the user interface. For this we use the date field input widget:
<datefield label="datefield.last_shop_visit">
	<binding variable="farmer">
		<attribute name="lastShopVisit"/>
	</binding>
</datefield>
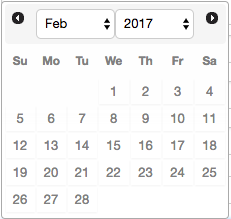
This provides the user with a calendar like widget to select the date and time. If the attribute we were binding to was of type date instead of type datetime only the date would have been selectable.
See the screenshots below for an illustration of this:


Note, that for the farmer CRUD functionality, we still make use of the Mez:now built-in function to keep track of when a farmer was created and updated by populating the registeredOn and updatedOn attributes respectively. This is done in the saveUser function of the FarmerUserMgmt unit. Please refer to the lesson source code for details.
Hiding Table Columns
As a reference consider the data table code below:
<table title="table_title.farmers">
	<collectionSource function="getFarmers"/>
	<column heading="column_heading.registered_on">
		<attributeName>registeredOn</attributeName>
	</column>
	<column heading="column_heading.first_name">
		<attributeName>firstName</attributeName>
	</column>
	<column heading="column_heading.last_name">
		<attributeName>lastName</attributeName>
	</column>
	<column heading="column_heading.mobile_number">
		<attributeName>mobileNumber</attributeName>
	</column>
	<column heading="column_heading.email_address">
		<attributeName>emailAddress</attributeName>
	</column>
	<column heading="column_heading.farm_address">
		<attributeName>farmAddress</attributeName>
	</column>
	<column heading="column_heading.farm_size">
		<attributeName>farmSize</attributeName>
	</column>
	<column heading="column_heading.longitude">
		<attributeName>longitude</attributeName>
	</column>
	<column heading="column_heading.latitude">
		<attributeName>latitude</attributeName>
	</column>
	<column heading="column_heading.state">
		<attributeName>state</attributeName>
	</column>
</table>
Note the many columns in the table added to the FarmerUserMgmt view. In some cases it is useful to have all the provided information on the table. More often, though, users would like to see a summary on this view with the possibility of all data should they wish. In Helium this can be achieved by hiding some of the table columns and only displaying all columns upon a certain user action such as the pressing a button.
To support this we make the following changes to the table:
<table title="table_title.farmers">
	<collectionSource function="getFarmers"/>
	<column heading="column_heading.registered_on">
		<attributeName>registeredOn</attributeName>
	</column>
	<column heading="column_heading.first_name">
		<attributeName>firstName</attributeName>
	</column>
	<column heading="column_heading.last_name">
		<attributeName>lastName</attributeName>
	</column>
	<column heading="column_heading.mobile_number">
		<attributeName>mobileNumber</attributeName>
	</column>
	<column heading="column_heading.email_address">
		<attributeName>emailAddress</attributeName>
	</column>
	<column heading="column_heading.farm_address">
		<attributeName>farmAddress</attributeName>
		<visible variable="showFarmerDetailInTable"/>
	</column>
	<column heading="column_heading.farm_size">
		<attributeName>farmSize</attributeName>
		<visible variable="showFarmerDetailInTable"/>
	</column>
	<column heading="column_heading.longitude">
		<attributeName>longitude</attributeName>
		<visible variable="showFarmerDetailInTable"/>
	</column>
	<column heading="column_heading.latitude">
		<attributeName>latitude</attributeName>
		<visible variable="showFarmerDetailInTable"/>
	</column>
	<column heading="column_heading.state">
		<attributeName>state</attributeName>
		<visible variable="showFarmerDetailInTable"/>
	</column>
</table>
The visible bindings shown above can be applied all widgets. This is demonstrated further in Lesson 12.
We also add a button that will be used to toggle between states where the table shows all columns and a reduced set of columns:
<button label="button.toggle_show_farmer_details_in_table" action="toggleShowFarmerDetailsInTable"/>
In the FarmerUserMgmt unit we need to add the function and variable referenced above and also initialize the showFarmerDetailInTable variable in our init function:
bool showFarmerDetailInTable;


void init() {
	.
	.
	showFarmerDetailInTable = false;
}


string toggleShowFarmerDetailsInTable() {
	if(showFarmerDetailInTable == false) {
		showFarmerDetailInTable = true;
	}
	else{
		showFarmerDetailInTable = false;
	}
	return null;
}
Dynamic View Labels
We now have a button that changes the state of the table. The button, however, stays static. We can improve this by adding a dynamic label to our button that changes along with the table state.
We do this by creating a variable in the FarmerUserMgmt unit and maintaining it's value along with the value of the showFarmerDetailInTable variable:
.
.
string tableLable;


void init() {
	.
	.
	showFarmerDetailInTable = false;
	tableLable = "Fat table";
}

string toggleShowFarmerDetailsInTable() {
	if(showFarmerDetailInTable == false) {
		showFarmerDetailInTable = true;
		tableLable = "Slim table";
	}
	else{
		showFarmerDetailInTable = false;
		tableLable = "Fat table";
	}
	return null;
}
We then reference the variable from a new lang file entry and reference the new lang file entry from our button:
button.fat_table_slim_table = {FarmerUserMgmt:tableLable}
<button label="button.fat_table_slim_table" action="toggleShowFarmerDetailsInTable"/>
Note that dynamic labels such as this can be applied to table titles, column headings and all view components with the exception of menu items.
Lesson Source Code
- No labels
Add Comment