Skip to end of metadata
Go to start of metadata
You are viewing an old version of this content. View the current version.
Compare with Current
View Version History
« Previous
Version 59
Next »
Mobile Application Generic Support Introduction
- Please start the support process by consulting the Mobile Device Related Support section, which is independent of any of the applications and are applicable to Android devices.
- The section below is a list of FAQ Questions some users may experience while using their Mobile devices or Application. Please open the documents highlighted GREEN to see step-by-step guides with screenshots to assist you in resolving your query. You are welcome to save these guides to your computer for future use or for distribution should a user need the steps on how to resolve their queries.
- All guides will have quick steps on this page to ensure you have fast access to the resolution should you are unable to download or open documents.
FAQ on Mobile Application | Answers and/ Quick Guides on how to resolve Your Issues. |
|---|
How do I Install the application?
| Please follow the steps with screenshots in the document below which illustrate how to download and enroll your application |
2. How do I Enroll my Application using the Enrollment SMS | Kindly open the document to view clear instructions on How to Download and Enroll my Application via SMS .pdf |
3. My Installation SMS do not give me an option to choose "Internet" when trying to install? | - Go to "Settings"
- Scroll down to "Application Manager"
- Take your index finger and scroll to your left too "All"
- Look for the application you click on and set as default "Always" e.g. Internet
- Once you have tap on "e.g. Internet" scroll down to "Launch default"
- Tap on "Clear defaults"
|
4. How do I synchronize my device? | - From your device home screen navigate to your application.
- In the top right hand corner of the screen click on the two arrows that forms a circle or the three dots also at the top right hand side of your screen and press the word 'Synchronize'.
- There will now be a bigger circle running in the foreground of the screen.
- As soon as the circle stops, there will be a message displayed at the bottom of the screen.
- Should the message display 'Data Synchronized' or "Synchronise button" turns green, then the synchronization was successful.
- Should you receive a 'Failed to upload data' message or the "Synchronise button" stays black, you then need to check if your mobile data is enabled or need to move around with the device to get a stronger network signal.
- Follow the steps below (Question 5) on to Enable your Mobile data
|
5. How do I check the synchronization status of the application? | 1.Open the Application. 2.Once the application is open, click on the triangle with the exclamation mark or tap the three dots and select 'Diagnostics' 3.Check if Network/Connectivity has a green mark or red cross. 4.If a red cross is present follow the following steps below: a. Tap on network b. Click on 'Network Settings' c. Select 'Mobile network' and tick the 'Enable mobile data' tick box. 5.Once the box is ticked, press the back button on the phone 6.The back button can be located on the right-hand side of the phone next to the huge square button. 7.Navigate back to the application, and press the Sync button. |
6. Denied for Security Messages
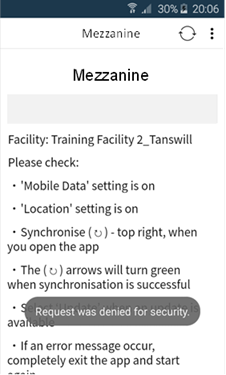
| The following steps can be checked to ensure this error is resolved: - Ensure that Mobile data is active and on, a Wifi connection can be tried to ensure there is stable connectivity if the area's signal are too weak
- Make sure the Device's Date and time settings are correct by doing the following diagnostics steps:
- Open your application
- Press on the three dots on the top right hand corner
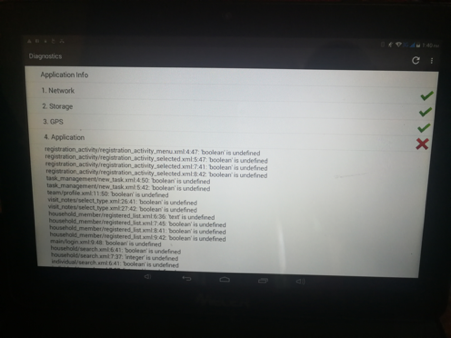
- Click on Diagnostics
- Make sure all items listed here are green Eg. Connectivity will show if there is problems with your date and time. Should the time still appear to be correct please continue to reset it in the settings still as Security denied errors are mostly linked to incorrect date and time settings. Follow the steps below to rectify:
- Go to settings
- Choose Date and Time Settings
- Remove the Automatic Date and Time mark to by sliding the marker to the left (grey)
- Now set the date and time manually
- Once done, set the marker again on (green) by sliding the Automatic Date and time marker to the right
- Restart the Device and open the Application again
- Now check if you are able to work with the Application without the Security denied errors again.
- Should the problem still persists, Use this code to test if the device certification is in order by opening the device's Internet browser and opening the following URL: https://za-zerorated-journey.mezzanineware.com/mobile
- If you are unable to open the URL as mentioned above, than it is a certificate problem and that will need to be rectified by your device manufacturer.
|
7. How do I enable Unknown Sources to my device will allow the links send from Mezzanine | Go to Settings on the Mobile device - Go to Security or Lock screen and security
- Look for the option Unknown Sources
- Make sure you enable unknown sources by clicking in the box next to unknown sources and exit the Settings menu.
|
8. How do I check the synchronization status of the application? | 1.Open the Application. 2.Once the application is open, click on the triangle with the exclamation mark or tap the three dots and select 'Diagnostics' 3.Check if Network/Connectivity has a green mark or red cross. 4.If a red cross is present follow the following steps below: a. Tap on 'Network' b. Click on 'Network Settings' c. Select 'Mobile network' and tick the 'Enable mobile data' tick box. 5.Once the box is ticked, press the back button on the phone 6.The back button can be located on the right-hand side of the phone next to the huge square button. 7.Navigate back to the application, and press the Sync button. |
9. How do I clear all the application data? | Navigate to “Settings” Scroll down and click on “Application manager” Now scroll down until you find your application Once found, Click on the application At the bottom click on “Clear data” and wait a few seconds Now you can exit the “Application manager”, re-open your application and login - Now you need to re-enrol your device, please send an email to your First-Line Support or if First-line are unable to assist, to support@mezzanineware.com to receive your enrollment link.
|
| Sometimes the Application needs a proper sync and time to allow the arrow to turn green, the Mobile User might not have noticed if the sync arrows turned green or they were not in a area with good Network connection.. The steps in the Document explains how to check the Application's LocalDB size: How to check if the Localdata base size are synced.pdf
The steps below are also illustrated with screenshots in the guide above: - Open your Application and click on the three dots on the top right hand side of the Application
- Click on 'Diagnostics'
- Click on Storage
- Check if the LocalDB size are all ZERO's, if it does not show all 0's on the sizes then it means there is still data that did not synced to the Web Portal yet and the User should press the synchronize button
 , located on the top right hand side of the screen to ensure the LocalDB size all shows zeros. The User can now press on the back button until they see the Main menu and press the sync button again, exit and open the Application to continue with work as usual. , located on the top right hand side of the screen to ensure the LocalDB size all shows zeros. The User can now press on the back button until they see the Main menu and press the sync button again, exit and open the Application to continue with work as usual. - When synced properly, the user will see that the size will show all zeros for all of the following and it means that all captured data will reach the web portal.
- Data (0bytes_0 Objects)
- Indexes (0bytes_ 0 Objects)
|
11. Mobile data and all other Checks are done but my Application still gives this error. 
| This issue happened on Aitahealth: Zendesk Ticket #12197 The user already tried a re-enrollment and this user were clued up as to how to make sure Mobile data is indeed active. Ask User to uninstall their application after they made sure that mobile data is active. Re-install application (Playstore or APK link) and send/sms User the re-enrolment barcode. |


