Lesson 03: User Input, Persistence, Validation, and Tables (continued)

As a System Administrator I want to invite and edit other System Administrators.


Lesson Outcomes

By the end of this lesson you will have built upon Lesson 2 to add functionality for the user to add (and then modify) more system administrators. This entails:

  • creating a form consisting of some input fields,
  • making use of Helium's invite built-in function (because we're dealing with roles),
  • using the <submit> widget, and
  • doing some input validation

And since we will then have some more data for our table than our one initial user, we'll go over some more table features.


New & Modified App Files

./model/SystemAdmin.mez

./model/Validators.mez

./web-app/lang/en.lang

./web-app/presenters/SystemAdminUserMgmt.mez

./web-app/views/SystemAdminUserMgmt.vxml


Adding Some Text Fields for User Input

To save a new object instance, we need to declare a variable of its type, populate its attributes one way or another, and finally call the appropriate built-in function to persist it to the database. The simplest, most direct way to save an object dependent on user input is to "bind" it's attributes to input fields so that Helium does the assignment for us when we click a submit button.

Declare a variable, named formSystemAdmin, of type SystemAdmin in the SystemAdminUserMgmt unit. This variable will be used for inviting new system administrators. We then bind its firstName attribute to one <textfield>, its lastName attribute to another, and the same for emailAddress and mobileNumber, all appropriately labeled. Add these text fields above the <table> widget:

<textfield label="textfield.first_name">
	<binding variable="formSystemAdmin">
		<attribute name="firstName"/>
	</binding>
</textfield>
 
<textfield label="textfield.last_name">
	<binding variable="formSystemAdmin">
		<attribute name="lastName"/>
	</binding>
</textfield>
 
<textfield label="textfield.email_address">
	<binding variable="formSystemAdmin">
		<attribute name="emailAddress"/>
	</binding>
</textfield>
 
<textfield label="textfield.mobile_number" >
	<binding variable="formSystemAdmin">
		<attribute name="mobileNumber"/>
	</binding>
</textfield>

The code snippet above shows the basic <textfield> widget with a label attribute and <binding> child element.

An alternative way to go about saving a new object instance is to bind a field (e.g. <textfield>) to a primitive which you then assign to an attribute of your object instance within your presenter code "manually":

<textfield label="textfield.first_name">
	<binding variable="firstNameInput" />
</textfield>
formSystemAdmin.firstName = String:upper(firstNameInput); //if for w/e reason we need the name in caps

This might be appropriate in some cases, like when you need to do some manual validation or sanitize user input, but in our case the former method is sufficient.


Adding a Submit Widget

<submit> buttons are aesthetically similar to <button> buttons but their behaviour differs with respect to the following:

  • They allow data captured on the view to be submitted to a unit
  • They do not allow for usage without an action function binding

<submit label="submit.save" action="saveUser"/>

Add the above below the text fields. Add submit.save = Save to your en.lang.

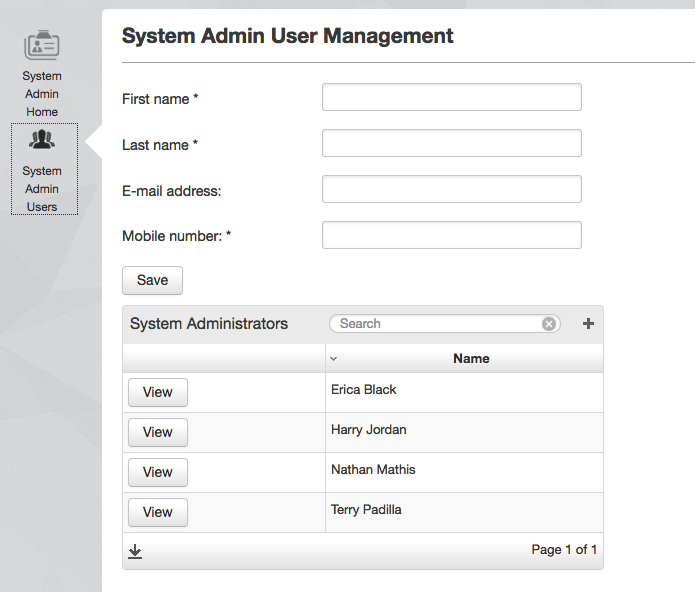
Your view will now look something like this:


Adding the Presenter Logic to Invite a New User

We need to make use of the invite() built-in function, because in this case our object is also a role and this is what will allow the user to log in. 

There are two versions on the invite() built-in function available to developers. One that requires the user's mobile number as an argument, and a second that takes both a mobile number and an e-mail address. For both of these, string values are expected. By specifying only a mobile number, an invite message will be sent to that number. Specifying an e-mail address, in addition to a mobile number, will result in an invite e-mail message being sent as well.

In its most basic form, saveUser needs to do only this:

DSL_VIEWS saveUser() {
   formSystemAdmin:new();
   formSystemAdmin.save();
   formSystemAdmin.invite(formSystemAdmin.mobileNumber);
   return null;
}

HOWEVER, calling formSystemAdmin:new() when the user hits save as above would mean formSystemAdmin, with all its attributes binding to text fields, will be recreated with those attributes empty again. So let's instantiate the object instance when the page loads instead:

void init() {
	formSystemAdmin = SystemAdmin:new();
	[...]
}

DSL_VIEWS saveUser() {
   formSystemAdmin.save();
   formSystemAdmin.invite(formSystemAdmin.mobileNumber);
   return null;
}

Returning null reloads the page without executing init() again, so the above will successfully save and invite the user, but then keep the saved object instance on the form, since its attributes are still binding to the text fields. We want the object instance to be reinstantiated after saving and inviting, so we can call new() on formSystemAdmin right before returning null, or instead call init() (which in turn calls new()):

void init() {
	formSystemAdmin = SystemAdmin:new();
	[...]
}
DSL_VIEWS saveUser() {
   formSystemAdmin.save();
   formSystemAdmin.invite(formSystemAdmin.mobileNumber);
   init();
   return null;
}

When you have an outbound SMS configuration set up (which we'll get to later in the tutorial), the invite built-in function will send an SMS message to the number provided, notifying the user that he/she has been invited to the app, and providing a temporary password.


When working on an instance that does not yet have an outbound SMS configuration, as is typical of development instances, you can invite your test data users to any made-up number, as no invite messages will be sent.

Also note that no specific configuration is required for e-mails to work. Keep in mind, therefore, that e-mail invite messages will always be sent when an e-mail address is specified as an argument to the invite built-in function.

Ensuring Valid Data

Validators

Helium lets you add validators to an object's attributes, which results in your app cancelling a submit action with an appropriate error message if you have entered a value that doesn't pass the validator's check.

First you create a validator (which should go in your model folder, saved as e.g. RequiredFieldValidator.mez):

validator requiredFieldValidator {
   notnull();
}

This validator is built using the following available "atomic validators" as building blocks:

validator/usagedescription
notnull();Check that the attribute is not null. This validator does not take any arguments.
regex("^[A-Z a-z]*$");

Checks that the value conforms to a regular expression. Allows upper & lower case and spaces.

regex("^[A-Za-z0-9 ]*$");Another regex example. Alphanumeric with spaces.
regex("^27[0-9]*$");Another regex example. Number starting with 27.
regex("\b[A-Za-z0-9._%-]+@[A-Za-z0-9.-]+[.][A-Za-z]{2,4}\b");Another regex example. Email.
minval(3.145);

Checks that the value is not less than the supplied minimum value.

maxval(6.18);

Checks that the values is not greater than the supplied maximum value.

minlen(2);

Checks that a string value does not have less characters than the supplied minimum value.

maxlen(255);

Checks that a string value does not have more characters than the supplied maximum value.

 Note the regex validation examples in the table above. These can be used to perform complex validation of text values that should be in a specific format for example, mobile numbers, e-mail addresses and identification numbers.

Next, add the validator to one or more of your object attributes. Validator annotations start with @:

@requiredFieldValidator("validator.required_field")
string firstName;

The translation key (i.e. from en.lang) is provided as parameter.

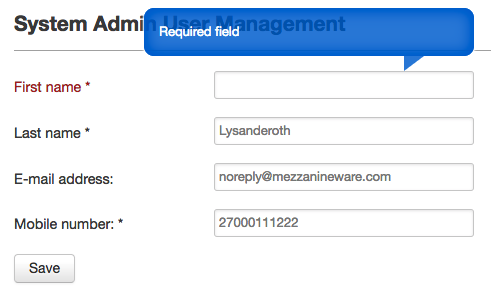
Now, if you try to submit without entering a first name for the system administrator, you will see this:

Validation with String:regexMatch(s, r) in the Presenter

Any value in a string variable can be compared to a specified regular expression for manual validation with bool b = String:regexMatch(s, r), such as:

if (String:regexMatch("27000111abc","^27[0-9]{9,}$") == false) {
    Mez:alertError("alert.invalid.phonenum");
}

(You don't need to add this to your tutorial app now.)

Data Type Hints

The datatype attribute can optionally be specified to alter the behaviour of the text field widget specifically for values that represent numbers, passwords, phone numbers, e-mail addresses, or URLs. Possible values are thus:

  • number
  • password
  • tel
  • email
  • url
  • text (default)

Note that when binding to a variable with an int data type there is no need to use datatype="number" as the behaviour will be implied.

For this lesson all our text widgets take the text type. The following (redundant, because of default behaviour) code snippet shows its use:

<textfield label="textfield.first_name" datatype="text">


Adding a Validators to the DSL project source code indicates to Helium that a database level constraint should be applied to the app schema to constrict possible data persisted. For more information about Helium's upgrade procedure please see Lesson 24

Adding an Edit User Feature

This will closely resemble the process to invite a new "System Admin" user. Add a <rowAction> labeled "edit" (refer back to the steps for adding the <rowAction> labeled "view"), and for its binding give it the same formSystemAdmin variable used when inviting a new user, which in turn is already bound to the input fields. This means the specific system administrator's details will pop into the input fields. In effect we reuse all the components created for inviting new users. The only difference in execution we want is for the object to be saved only - without an invite firing again - so we'll bind the <rowAction> to a function editUser that sets a flag which we'll check when clicking to save.

<rowAction label="button.edit" action="editUser">
   <binding variable="formSystemAdmin" />
</rowAction>
bool editing;
 
void init() {
   systemAdmins = SystemAdmin:all();
   formSystemAdmin = SystemAdmin:new();
   editing = false;
}

DSL_VIEWS saveUser() {
   formSystemAdmin.save();
   if (editing == false) {
      formSystemAdmin.invite(formSystemAdmin.mobileNumber);
   }   
   init();
   return null;
}

void editUser() {
   editing = true;
}

Note the above snippet introduces the primitive boolean (bool).

We have also used the if keyword for the first time in this tutorial. It looks and functions the same as in other C-like languages. Likewise for an if-else statement:

if (editing == false) {
   formSystemAdmin.invite(formSystemAdmin.mobileNumber);
} else {
	//already invited, do nothing
}


Please note that the default value of all uninitialised variables is null. If you were to only declare the bool editing in the example to the left, without doing the assignment to false, it's value would (unlike many other programming languages where the default is false) still be null.

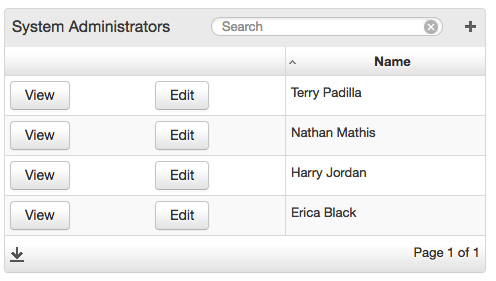
More Table Widget Features

You can now add enough system administrators to see how the <table> widget's search filtering and sorting works.

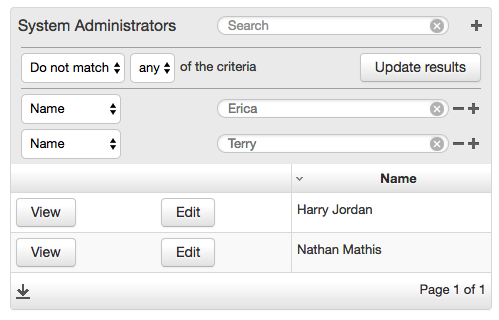
The basic search field, visible by default, will filter table records if it finds your search query in any of its columns. Clicking the + opens advanced search options, so if I want to see any and all instances of SystemAdmin except those with a particular name it will look like this:

In a later lesson, when we display larger, more complex objects, you'll have the opportunity to test advanced searching on e.g. date values, allowing you to filter for a particular period. The search options is based on the type of value populating the selected column.

Sorting

By default a table is sorted on it's first column and the sort direction is ascending. To change the default sort column and direction you can use the defaultSortColumn and defaultSortDirection attributes.
The defaultSortColumn column is zero indexed (so the first column is 0), and must be a valid integer value.
The only values for defaultSortDirection are "ascending" (default) and "descending".

<table title="table_title.system_admins" defaultSortColumn="0" defaultSortDirection="ascending">

Row Limits & Paging

A table will by default break at ten rows and begin to page. However, the user can change this to 10, 20, 30, 40 or 45 rows. Upon selecting the number of rows to display (the page length) the table is updated immediately. If there is more than one page available, the user can jump between pages using a page index widget at the bottom of the table.

CSV Export

By default CSV exporting is enabled for all <table> widgets and can be triggered by clicking the "Download CSV" icon on the bottom left of the widget. Only the columns represented in the table will be exported. The file name will be constructed using the title of the table, if it has been specified, and the current date/time. For certain tables, however, such as tables acting as custom menus, CSV export can be disabled as shown in the code snipped below: 

<table title="table_title.system_admins" csvExport="disabled">

Filter Destination

The currently filtered records in a table can be bound to a collection in a presenter.

SystemAdmin[] filteredUsers;
<table title="table_title.system_admins" csvExport="disabled">
   <collectionSource variable="systemAdmins"/>
   <column heading="column_heading.name">
      <attributeName>firstName</attributeName>
      <attributeName>lastName</attributeName>
   </column>
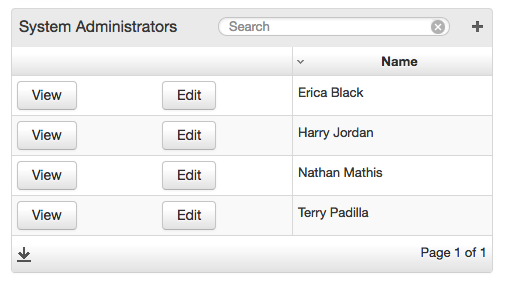
   <rowAction label="button.view" action="viewUser">
      <binding variable="selectedSystemAdmin" />
   </rowAction>
   <rowAction label="button.edit" action="editUser">
      <binding variable="formSystemAdmin" />
   </rowAction>
   <filterDestination variable="filteredUsers" />
</table>


Automatic Refresh

The <table> widget allows a time interval between 30 and 1800 seconds to be specified at which point the contents on the table is refreshed without the need for any user intervention.

<table title="table_title.system_admins" refreshIntervalSeconds="30">


Lesson Source Code

Lesson 3.zip