Versions Compared
| Version | Old Version 12 | New Version 13 |
|---|---|---|
| Changes made by | ||
| Saved on |
Key
- This line was added.
- This line was removed.
- Formatting was changed.
As a Farmer I want to purchase items from a shop and make payments using the Helium app
| Table of Contents |
|---|
Lesson Outcomes
Scenario
The app use case for this lesson is that a farmer would like to make purchases from a specific shop using the application. This includes making a payment to the shop using Helium pay framework.
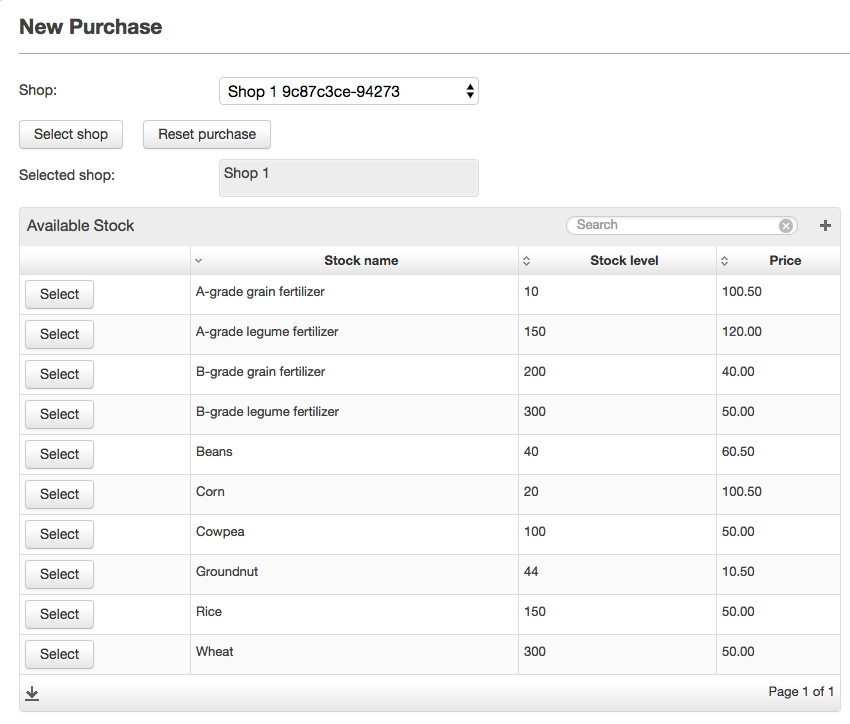
Firstly, a farmer will select a shop and use a submit button to confirm his selection. The view will then be updated to display a table of all the stock items that a shop has in stock. This includes the name of the item, the current stock level and the current unit price for the stock item. The farmer will then select a stock item using a row action on this table.
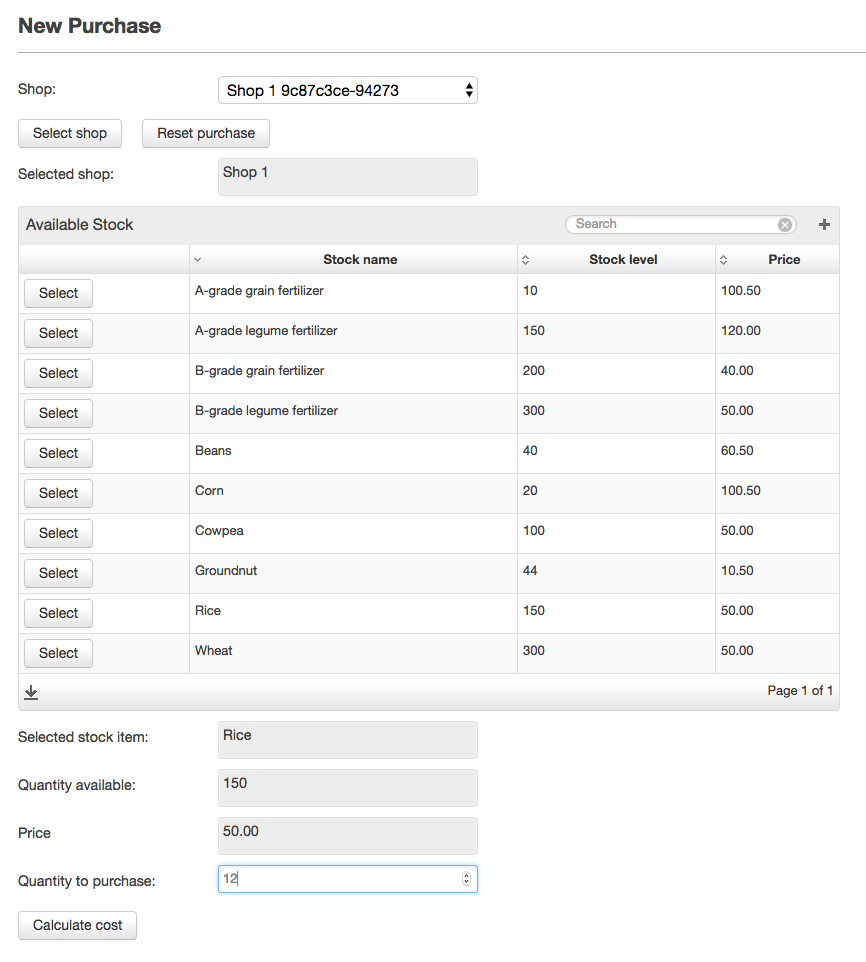
Once this selection has been make the view will again be updated to include info widgets showing the currently selected stock item, its stock level and unit price as well as a text area where the farmer can specify the quantity of the item he would like to purchase. Another submit button to calculate the total cost of the selection can then be pressed.
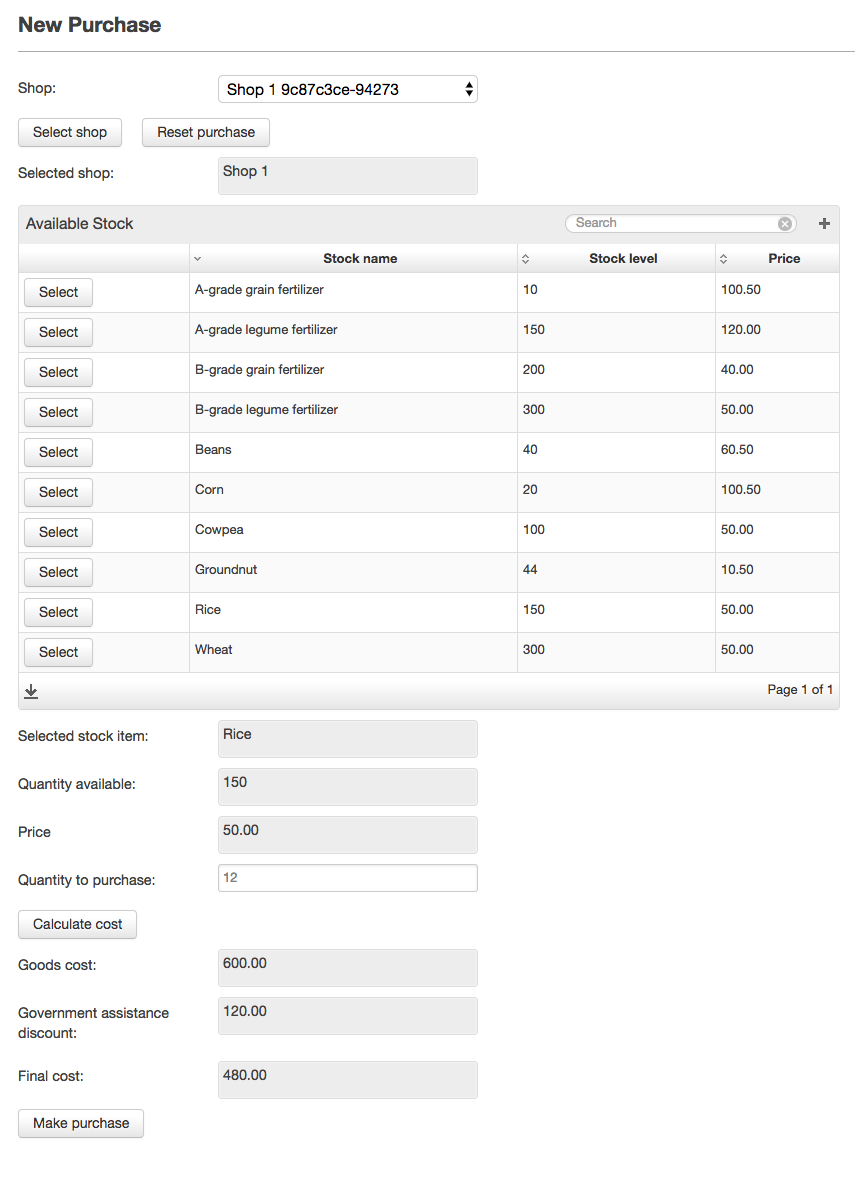
Once this has been done additional view components appear. This will be a summary of the price for the goods, the discount offered if the farmer has previously uploaded a government assistance certificate and the final cost to the farmer. Once the farmer confirms this, the payment will be recorded and sent to Helium for processing using the payment framework.
Tutorial App Files of Interest
Data Model Additions for Farmer Purchases
The only addition required for our data model is an object to keep track of purchases made by farmers. This object needs to keep track of the purchase details such as item that was purchased, unit cost, discount and final cost. It also needs to keep track of the internal Helium payment status and id. This is discussed further later in this lesson. Further more, the object also need to keep track of the Farmer, Shop and Stock item that was involved in the transaction.
| Code Block | ||||
|---|---|---|---|---|
| ||||
persistent object FarmerPurchase {

	// When was the purchase made
	datetime purchasedOn;

	// Quantity and cost of purchase
	int quantity;
	decimal unitPrice;
	decimal goodsCost;
	decimal discount;
	decimal finalCost;

	// Helium provided payment status and id
	PAYMENT_STATUS paymentStatus;
	uuid paymentId;

	// Stock item that was purchased
	@ManyToOne
	Stock stock via purchases;

	// Farmer that made the purchase
	@ManyToOne
	Farmer farmer via purchases;

	// Shop at which purchase was made
	@ManyToOne
	Shop shop via purchases;
} |
Overview of View and Unit Additions for Making Purchases
For the implementation of this feature we have added the NewFarmerPurchase view. This view has a menu item for the farmer role and is thus accessible from the main app menu. This single view will be used by the farmer to perform purchases from specific shops.
In addition a view containing all historic records is also added and is accessible from an action button on the NewFarmerPurchase view.
These two views are backed by the FarmerPurchases presenter file and unit.
Widget Visibility
As mentioned in the scenario that accompanies this lesson we will have multiple stages within the flow of the purchase feature. Despite this we will only be using one view for this. After each stage, more view components become visible to the user. This is achieved using "visbile" function bindings. The following code snippet shows the functions that are used for these bindings:
| Code Block | ||||
|---|---|---|---|---|
| ||||
// Once a shop has been selected, the stock items for this shop can be displayed
bool showStockTable() {
	if(shop == null) {
		return false;
	}
	return true;
}

// Once a stock item has been selected is can be displayed with a text field for the quantity to purchase
bool showPurchaseForm() {
	if(showStockTable() == false || selectedStock == null) {
		return false;
	}
	return true;
}

// Once the purchase quantity has been validated and the price calculated the cost summary can be displayed
bool showSummary() {
	if(showPurchaseForm() == false || goodsCost == null) {
		return false;
	}
	return true;
}

// In the case of a farmer with a government assistance certificate the discount related to this should
// also be shown as part of the final cost summary
bool governmentAssitanceApplicableAndSummary() {
	if(showSummary() == false || farmer.governmentAssistanceCertificate == null) {
		return false;
	}
	return true;
} |
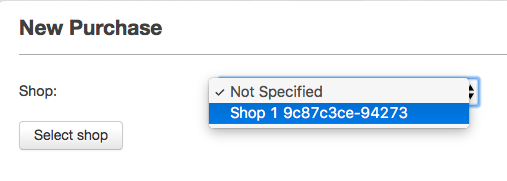
The screenshots below show the difference stages of widget visibility for the NewFarmerPurchase view:
 Image Added
 Image Added
 Image Added
 Image Added
| Info |
|---|
Be careful when using visibility bindings on all your view components. If they all evaluate to false your view will fail to load instead of simply showing an empty view. |
Pay Built-In Function
Once we have done all we need to do in our app to prepare for a payment the payment can be submitted to Helium by making a call to the pay built-in function. The following code snippet demonstrates this:
| Info |
|---|
Note that some configuration is required in order for apps to be enabled to make payments. Consult Helium DevOps in order to have your app configured for making payments. |
@OnPaymentUpdate Annotation for Payment Callback Functions
Helium processes payments asynchronously. This means that a result of a call to the pay function will not be immediately available.
Helium provides a mechanism whereby an app function can be declared as a callback that will be invoked once Helium has an update on the payment status. This is implemented by means of the @OnPaymentUpdate annotation.